How to install a flexible chimney liner
Lining a chimney is often done as a DIY job but it must be remembered that since April 2002, work done to an existing chimney now comes under building control (see our building regulations section). It also involves working at height - so please remember that you only have one life.
We can supply the flexible flue liner and everything you need for the job. You are welcome to talk through what you need with us first, you can fill in our simple form and we will ping back the list of parts needed, or you can order online. And we currently have an offer on so that when you buy a stove at the same time you get the liner at half price.
If you're in doubt about fitting the flexible flue liner yourself then you can get the parts you need from us and we can recommend a local registered installer to come out and fit it for you.
Tools required to fit a flexible chimney liner to an existing UK chimney:
A length of rope, other ropes (for safety), cement, sand, integral waterproofer, unibond, trowel, hammer and cold chisel, metal snips, buckets, old paintbrush, Phillips screwdriver, adjustable spanner and pliers.
Fitting a flexible chimney liner to an existing chimney is a 2 person job.
Person 1 goes onto the roof while person 2 waits at the fireplace.
We recommend that person 1 proceed with all due caution. Use roof ladders where possible, tie yourself to solid roof structures, (chimney stacks are good for this), so that if you slip you don't fall off the roof.
Person 2 should have a dust mask, goggles and wear suitable clothes and protective hat - a lot of dust is likely to fall down the chimney, as well as larger lumps.
The ends of the chimney liner can be very sharp - take care. We recommend that gloves are worn and that the ends of the flexible liner are protectively taped with gaffa tape.
Preparation
Before attempting to fit a chimney liner to an existing chimney, you must always sweep the chimney. Do not attempt to fit a liner without first sweeping the chimney.
If there is a chimney pot then this will need to be removed along with any mortar which was holding it in place.
You may be able to re-use this chimney pot, once the flexible liner has been fitted, as long as the internal diameter at the top is not less than the diameter of the liner and it isn't damaged.
If fixing a register plate then it is usually easiest to do the rawlplugs ready for it to be fixed in place, but actually screw it into place once the chimney liner is down.
Fitting the chimney liner - Step by step
First step - go onto the roof and take a length of rope (at least 5m longer than your chimney is high) and a weight. Drop the rope down the chimney with the weight at one end. Sometimes the rope needs "persuading" to get past obstacles and bends in the chimney. You can feel these points as the rope going slacker. You can usually get past these points by raising the rope a little and then lowering the rope again.
When the person 2 lets you know that it is down, tie off the rope on the roof so it doesn't fall all the way down the chimney.
Get the chimney liner up onto the roof. Check that the liner is the correct way up, there is a small arrow approximately every one and a half meters on the outside of the liner, the arrow should be pointing up the chimney.
Alternatively, you can rub your little finger up and down the inside of the bottom of the liner. The liner should feel smooth on the way down and rough on the way up. The inside layer has an overlaid coil running all the way down the inside. This is similar to a tiled roof in order to make sure that any soot or moisture is directed down. Please make sure you use gloves, as the liner edge is extremely sharp.
If you have any doubts, please call our technical team.
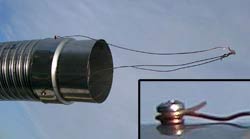
Wires fixed to the liner adapter
which allows you to attach a rope.
With a straight chimney, that is big enough for the liner to go down easily, I prefer to attach the flex adaptor first and then attach the pulling rope via three lengths of wire wrapped around the self-tappers on the adaptor. If it looks like the liner might be a very tight fit, then use a nose cone and attach the rope to that.
Put the closing plate over the top end of the liner and clamp the Top Fixing Clamp above that.
If using linertherm then attach this around the flexible liner. You can wrap the entire liner at once or fit it section by section as you pull it down the chimney. .
Person 1 and 2 need to work together, either by prearranged method or shouting. Often it is possible to hear each other by shouting through the chimney. Person 1 may find that person 2 can hear them better if they shout into the free end of the liner. As you feed the liner into the chimney, try and straighten it so that it doesn't curl inside the chimney flue.
If the liner gets stuck then raising it a little and then trying again may work - try this repeatedly. Person 1 may also push a little.
If Person 2 can see what is obstructing the liner (they will need a light) then they may be able to free it up, using a stick or something else. Remember that debris may very well fall down the chimney at any time during the installation of the flexible liner.
If the liner is really stuck then you can solve this problem by measuring the remaining liner to work out where the liner is stuck. Measure down this distance and open up the chimney inside the house a little below this point. Pulling the rope so that it makes a noise may help to locate where the chimney is inside the house. Solve the obstruction problem and close the hole up again afterwards.
Once the liner is down as far as it needs to go, if you are not using insulation, or if you are using linertherm, move the fixing clamp down the flexible chimney liner till it rests on the top of the chimney and supports the weight of the liner at the required height. You may need to pull up a little on the liner before you tighten the fixing clamp.
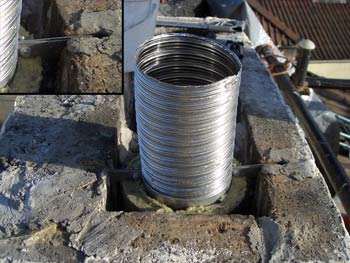
The fixing clamp is fitted and recessed into the chimney to allow
the closing plate to sit flush on top of the chimney.
The liner has also been cut to length.
It is best to notch the chimney to allow the fixing clamp legs to sit flush with the top of the stack and so let the closing plate sit flat above the fixing clamp. Often all you have to do is remove some of the masonry from between bricks. The clamp can go above the closing plate instead if it is easier, but it must be remembered that the fixing clamp must still bear on the sides of the chimney as the closing plate is NOT a support component. If the chimney opening is too wide for the clamp to bear on both sides then reduce the opening using a couple of pieces of paving slab, thick slate etc or stainless steel bars.
If you are doing a leca backfill then tie the liner off while you fix the register plate in place. Once the register plate is screwed into place put your hand up through the flue hole of the plate and put a fillet of mortar all around the outside edge of the plate where it meets the walls so as to seal it. Pull the adaptor through the register plate hole and tighten the clamp around it. Now you can go back up and do the leca backfill. Pull the liner up as you backfill to keep it as straight as possible and fill the whole chimney with leca.
Cut the excess liner using metal snips or a hacksaw so that about half the height of your pot is left. Remember that the edges of the flexible chimney liner will be very sharp. You need to fill the space in between the liner and the pot with mortar otherwise water may run down the outside of the liner. If this is not possible then cut the liner off shorter until it will be possible to fill the gap with mortar.
Once backfilled you can fit the fixing clamp and closing plate.
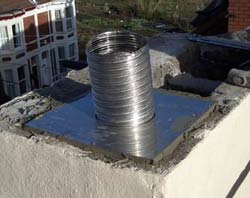
The closing plate has been bedded in mortar
and closes off the gap between the liner
and the chimney.
Make a mix - 5 sand to 1 cement and integral waterproofer. Work the mix thoroughly, (work it more than usual - the more you do, the better and easier a job it will be). Wet the top of the chimney, chimney pot, liner stub, closing plate etc with a unibond and water mix to give the mortar a good key. Slap on loads of mix around the chimney liner and push the pot over it into the mortar bed. As discussed above get some mortar between the chimney liner stub and the inside of the pot so than any rain that gets into the pot will end up going down the chimney liner, not down the outside of the liner. Use a spirit level to get the pot straight.
The flaunching around the pot should be done so that the mortar is very smooth and sloped so that it runs the water away from the pot. An overhang that keeps the drips away from the stack is always a good thing.
Wipe the chimney pot with a wet sponge afterwards to remove cement and dirt marks. Affix some type of cowl, either a raintop or an anti-downdraft cowl if there is the possibility of downdraft.
Connect the stove to the flexible chimney liner adaptor with a length of rigid flue and give it all a minimum of 24 hours to go off before you light the stove.
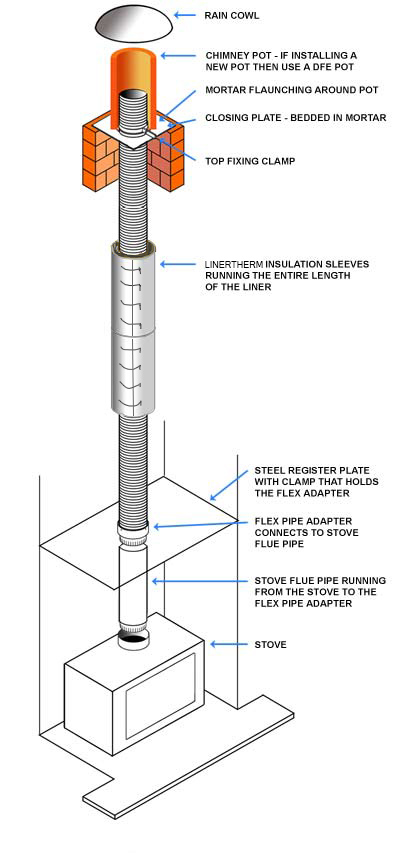
Typical chimney liner installation
We can supply everything you need to fit your flexible flue liner. You can talk it all through with us first, or fill in a simple form and we will come back with a list of everything needed, or you can just order online if you know what you want.
We also currently have an offer on so that when you buy a stove at the same time you get the liner at half price.