Twin wall flue systems
A twin wall insulated flue system is a quick and easy way to make a new chimney that is safe, takes up little room and is fast to install. The insulation protects your home from the heat in the chimney and helps the new chimney to work well - meaning you will get the best from your stove. Standard components support the system and take you through floors and ceilings. Our AKW twin wall flue is what is called an "open ended" system: the lengths push and then clip together with the insulation inside one part touching the next forming a continuous shroud of insulation all the way up.
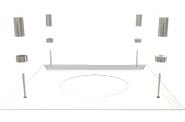
Typical Internal flue and External Flue System
General information
Supports
The weight of the flue system must be supported either by a floor support, roof support or wall support. When attaching the flue to the support make sure that the support component takes the weight, not the stove. You may have to raise the flue up a little when fixing the support component. There should be some type of fixing every 2000mm. If you are using bends/offset then there should be a weight bearing support above and beneath the offset. The fixing can be a wall band or wall fixing bracket (to prevent lateral movement) or one of the load bearing supports as above.
Dimensions and clearances using the Clearline AKW Twin Wall Flue System
The flue must be at least 50mm from combustible surfaces, so any holes in combustible floors etc must be cut 120mm larger in diameter than the external diameter of the flue. Thus you should cut a 300mm diameter hole for 150mm double skin flue.
Where single skin flue pipe is used from the stove which then changes to twin wall below the ceiling, the changeover point should be at least 425mm below the ceiling.
Single skin flue pipe should be at least 3 times its diameter away from combustible materials (ie 150mm pipe should be 450mm from combustible materials). Building Regs do not specify clearances for the stove itself and manufacturers recommendations vary greatly. As a general rule maintain at least 100mm from non-combustible surfaces and at least 400mm from combustible surfaces. You can effectively heat shield materials by using 12mm fireboard with a 12mm air gap behind.
Cutting single skin flue
Clearline Stainless steel single skin flue can be cut to length, cutting from the female end of the pipe. If you need to use a joint clip on the cut end gently bend it out with pliers in four places to give the joint clip something to grip.
When cutting enamel flue pipe with an angle grinder wrap the section you are keeping in a cloth to protect the enamel. Be careful that you cannot catch the cloth in the angle grinder. You cut the plain female end but you will lose the swage which normally sits on the flue collar. Double skin flue cannot be cut to length, but adjustable lengths are available.
Spraying stainless steel flue pipe
Make sure that the flue is free from dirt & grease and spray it once it is installed. The paint undergoes its final curing once the flue heats up.
All double skin joints are push-fit together without fire cement, and have a locking band. You should not have joints occurring within a floor or in a flashing.
Twin wall flue components
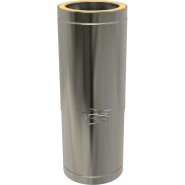
The adjustable lengths have an inner and outer layer which the other length slides between. The rockwool insulation is trimmed to length and goes in the gap between the layers of the first length. The adjustable length requires 50mm clearance to combustible materials and you must never have an adjustable length within a ceiling, floor or roof penetration.
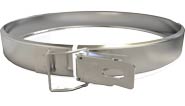
The joint between every piece of double skin flue is secured using a locking band, as well as the joint between the plain adaptor and the first section of double skin flue and a locking band also goes between the cowl and the last section of flue.
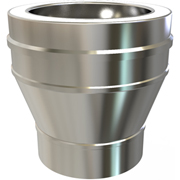
The plain adaptor connects the double skin flue to the stove or to the single skin flue pipe. The top push-fits into the bottom of the first length of double skin flue (and is secured with a locking band) and the tail fits into the stove flue collar or into the single skin flue pipe and is sealed with fire cement.
The Firestop Cover Plate fits to the Ventilated Ceiling Support and covers up the hole around the double skin flue.
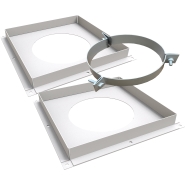
The Ventilated Ceiling Support kit is a support assembly consisting of two Ventilated Ceiling Support plates and a Support Band. The Ventilated Ceiling Support plates are screwed to the ceiling and to the joists above, through which the flue goes through. The Support Band is then tightened around the pipe resting on the upper plate, carrying the weight of the flue system.
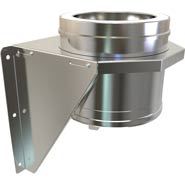
The Adjustable Base Support bracket is a supporting component. The triangular plates can be fixed above or below the plate, which can connect to a flue pipe length or a T or elbow.
The Roof Support bracket is a supporting component. The two pivoting brackets are attached to any angled rafters either side of the flue pipe and self-tapped to it.
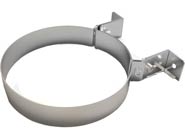
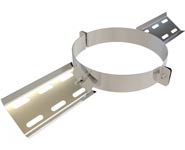
The Wall Band is used to hold the flue to the wall and often to hold the flue to the rafters as the last fixing. The band can be adjusted between 50-80mm. Sometimes packing out behind the band is required. This component is not load bearing.

Adjustable Wall Bands are used to fix the flue to a wall where the flue is further away than a wall band would allow for. Adjustable Wall Bands come in three sizes, 80-130mm, 130-210mm and 210-420mm. These components are not load bearing.
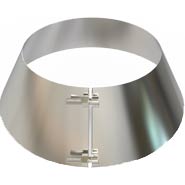
A Storm Collar is clamped around the pipe, with a bead of silicone mastic, just above the flashing plate. A storm collar can also be used on the angled arm of a 135* T where the flue has passed through an outside wall.
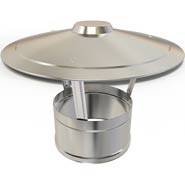
A Rain Cap is the last component in a double skin flue system. This stops rain entry to the flue system and is secured with a locking band. Anti-down draught cowls are also available.
On first lighting your stove only light a small wood fire for about 1hr and then let it die out. Once the stove has cooled you can burn as normal. On the first few firings you can expect some smoke/odours to come off the stove and a slight acrid odour. This is completely normal and is part or the curing of the fire cement and stove paint.
Everything should be fitted in accordance with the manufacturer's recommendations and building regs document J. If in doubt contact us
We can design your flue system for you, for free, just use our Flue Design Service